NewChallengerStore.com
Dodge Challenger SRT8 (2008-12) Front Engine Harness Cover
Part #
ACC-153015
Your cover comes to you with a protective liner. Do not remove liner until installation is complete.
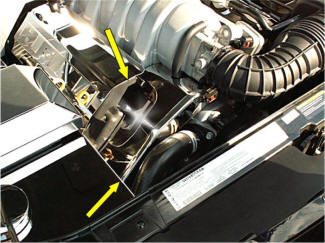
This new cover has been designed to hide the large electrical harness that has been placed on the front passenger side of the engine. The new cover will nicely customize the engine and is easy to install in just a few simple steps.
1. The first thing that will need to be done will be to rearrange the factory harness in order to receive the new cover. You will notice that the harness is fastened to the two front bolt studs in front of the valve cover. Simply pull up on the harness at the two locations and completely detach it.
2. You will notice that the harness is kind of spidered up to its connections and that one of the connections leads up to the top of the air intake tube. Temporarily separate the air tube connection by loosening the clamp and pulling it loose from the throttle body. With the tube separated force the harness so that it will wrap around the right side of the round opening and then under the throttle body. It may be necessary to slice the electrical tape banding slightly in order to allow you to do this. Once the wire has been successfully rerouted replace the air tube and clamp. Because the harness has been released from the valve cover and some of the banding opened up some you will have enough slack in the harness to achieve this re routing however you may have to get a little tough with it and pull the harness forward to gain the small amount of slack needed to do the rearrangement so that the connections do not become to tight.
3. Now that the harness has been successfully rearranged the next step will be to temporarily remove the front upper bolt of the throttle body just to the left of the air tube.
4. Place the new cover over the two bolt studs of the valve cover and work the cover down into position as you manipulate the large vacuum hose into the large notch at the top of the cover. As you work the cover down line up the front hole with the bolt hole you just exposed at the front and then reinsert the factory bolt through the new cover and back into the throttle body and tighten.
5. You have been provided with two small nuts to be threaded over the two factory bolt studs at the back of the new cover. Once you have inserted them simply snip off the excess stud with a small bolt cutter. You have been provided with three decorative nut covers. Using clear 100% household silicone simply applies a small dab into each of the three covers and set them in place allow a couple of hours for the caps to set.
CARE AND
MAINTENANCE:
Note: Care must be taken when cleaning your cover. It is a good
idea to lightly dust your cover with a clean soft cloth first in
order to prevent any particles from scratching it. Then wipe (using
a new clean soft cloth) with a good quality streak free glass
cleaner.

For Help - please call 352 688 8160 or email
us at admin@NewChallengerStore.com
NewChallengerStore.com a HotCarAccessories.com website
Not affiliated with
Dodge, Chrysler Corporation
or it's divisions.