NewChallengerStore.com
Dodge Challenger SRT8 (08-09) Firewall
Part #
ACC-153010, ACC-153011, ACC-153005 & ACC-153006
PLEASE READ ENTIRE INSTRUCTIONS BEFORE BEGINNING INSTALLATION!
Your new firewall comes to you with a protective liner. Do not remove liner until step 4.
1. Remove engine cover.
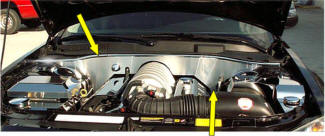
2. You will notice a large vacuum valve bolted to the shock tower just to the left side of your engine bay. (Passenger side) Unbolt this valve and use the same bolt to attach the extension bracket (provided). Then attach the valve to the bracket using the ¼-20 nut and bolt (provided). This procedure will force the vacuum valve to sit in a further back position in order to allow the false firewall placement. You will also need to reroute the water tank fill line. This line has been routed by the factory across the engine bay to the tank and is not very nice looking and can be pinched by the firewall if left in position. To fix this simply remove the line from the tank, reroute the line behind the aluminum block bracket that is mounted to the shock tower pull it back up to the tank and reinstall. This will nicely tuck the fill line out of the way and out of view.
3. Your new firewall panel comes to you flat. In order to achieve a nice conforming fit along the wiper cowl gasket ridge it will be necessary to slightly form the panel by hand. To do this you will need to remove it shape it some and place it back into position several times until the panel begins to sit relatively parallel to the wiper cowl ridge. It is also important to make sure that the fuel line is centered in the notch provided. We have experienced the transmission dip stick can be over to one side or the other from car to car should this be the case with your vehicle the tube can easily be adjusted by inserting a large long screwdriver into the tube. This will give you ideal leverage to nudge the tube so that you can achieve a nice centered appearance. Once you are satisfied with the fit drill two 9/64 holes directly thru the upper chrome trim and into the cowl ridge. Just to the left and right side of the firewall you will notice two large plastic circular cowl retainers on the cowl. These are good locations to place screws thru the firewall to hold it securely.
4. Once the holes are drilled, remove the protective liner. Then secure with the two chrome oval head screws (provided), just enough so that the head of the screw countersinks itself into the chrome trim. Be sure not to over tighten. Then push in the two chrome screw covers (provided) to achieve a nice finished look. Replace engine cover. HELPFUL TIP: There are two ground bolts on the left and right side of the engine bay just hidden behind the shock tower ridge. For best placement of your new firewall you may want to rest the panel in front of these bolts!
5. For SRT 8 Models Only: Thoroughly clean the top of the factory transmission fluid dip stick cap with household rubbing alcohol then swipe the factory cap once with the adhesive promoter provided. You have been provided with a chrome cap cover remove the Velcro attachment cookie and install it onto the factory cap and press firmly to set. Then simply place your new cap cover in position.
CARE AND
MAINTENANCE:
Note: Care must be taken when cleaning your cover. It is a good
idea to lightly dust your cover with a clean soft cloth first in
order to prevent any particles from scratching it. Then wipe (using
a new clean soft cloth) with a good quality streak free glass
cleaner.
For Help - please call 352 688 8160 or email
us at admin@NewChallengerStore.com
NewChallengerStore.com a HotCarAccessories.com website
Not affiliated with
Dodge, Chrysler Corporation
or it's divisions.