NewChallengerStore.com
Dodge Challenger Front Headlight Bezels
Part #
ACC-152001 - CHHS808
Instructions
PARTS INCLUDED: 2 x Brushed Stainless Bezels, 1 x Adhesive Promoter Pack, 4 x Strips of 5/8” Chrome Molding 22”
Your covers come to you with a protective liner. Do not remove liner until installation has been completed.
1.
Thoroughly clean the taillight areas to be mounted with
rubbing alcohol to remove any and all dirt and or waxes.
After this
step use the piece of test tape (included) or a piece of masking tape to see if you have achieved a
tack. If the test tape sticks well in several areas where you plan
to mount your new trim then proceed to the next step. If it is
not sticking well you still have oil on the surface clean again
until it the test tape sticks.
2. Now take the promoter
packet or pen (included) and swipe the areas where you will mount
your new trim plates. The promoter liquid is clear and will
not harm your paint or interior.
3. You have been provided with four strips of chrome molding. Two of these moldings will be longer then the other two and will be applied to the outer openings of the factory bezel.
4. Take a look at the top of
each whole opening. You will notice that the openings are cut off
and flat at the very top.
NOTE: The moldings will not cover these areas
(see Diagram B).
Peel a small
length of the red release liner from the back of each section of
molding and apply it directly to the corner of the opening and apply
pressure to set the molding so that it sets nice and flush with the
outside edge. (see Diagram B) Set the molding all the way around to the opposite
side and snip off any excess molding with a scissor. Press firmly
along the entire length to set. Do this for all four whole
openings. The molding is wider than the edge you are mounting
it to - it's ok.
5. Now that you have each of the four (headlight) holes lined with the chrome molding you can apply the outer bezel. Before you permanently install the bezel place it in position to get acquainted with the proper position. You will notice that the holes in the bezel will slightly overlap the chrome molding and should line up with the outer shape of the factory bezel. Once you have a good idea how the bezel will set in place simply remove the red release liner from the back of the bezel and carefully reset it in place. Be sure to take your time as the adhesive tape is very aggressive and will not allow you to reposition the bezel once it has made contact so go SLOWLY. Repeat the application for the opposite side and remove the protective liners to finish the installation.

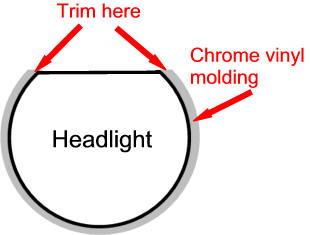

Photo A
Diagram B
Inside edge of lamp cutout
CARE AND
MAINTENANCE:
Care
must be taken when cleaning your cover. It is a good idea to lightly
dust your cover with a clean soft cloth first in order to prevent
any particles from scratching it. Then wipe (using a new clean soft
cloth) with a good quality streak free glass cleaner.
For Help - please call 352 688 8160 M-F or email
us at admin@NewChallengerStore.com
NewChallengerStore.com a HotCarAccessories.com website
Not affiliated with
Dodge, Chrysler Corporation
or it's divisions.