NewChallengerStore.com
CHALLENGER UPPER AND LOWER GRILLE OVERLAYS
Part #
ACC-152014, ACC-152015, & ACC-152016
Your new grille overlays have been designed to attach directly to the stock grille offering a beautiful enhancement of the factory design.
1. For the upper grille - Remove the factory emblems from the stock grille by carefully pulling them outwards unsnapping them from their position. You will be reusing them.
2.
Thoroughly clean the factory grille as well as the painted surface
directly in front of the grille with alcohol to remove any road
grime and dirt.
Once properly cleaned take the piece of test strip tape (included) and remove a portion of the back red liner
or a piece of masking tape . Stick the test
tape strip to the area in where you will be mounting your new trim. Test
several areas. If it is tacky and sticks then proceed to the next
step. If it is not sticking very well in any of the spots you tested
then re-clean the area until the test strip sticks to all areas. If
the test strip tape doesn't stick well neither will your new trim
piece.
3. Now using the adhesive promoter (provided) swipe the clean grille and painted area where you will be attaching the grille. Take special care to apply the adhesive promoter to the entire grille surface. This will insure the new overlay will remain bonded under all weather and road conditions long term. The promoter is clear and will not stain or damage your paint.
4. Now that the factory grille has been properly prepared - Without removing the rear red liner place the grille overlay in position to get acquainted with just how it will set in place. The attachment tape on back of the grille overlay is very aggressive and will not allow you to reposition it once it sticks so go slowly. Once you are confident that you can place the grille correctly remove the rear red release liner from the back of the overlay and carefully and gently set in position. Make any tiny final adjustments. Now press firmly along the entire surface to set the new grille overlay permanently.
5. You have been provided with a length of chrome trim. Peel a small length of the red release liner from one end of the trim then start at the top dead center of the grille place one end of the trim directly to the paint but tight against the grille overlay you just installed. Pull the red release liner as you work your way around the edge of the grille until you reach the start point. Cut away the excess trim with a scissor so that you will be able to press the end into a nice tight butt seam. TECH TIP: This trim will have a tendency to shrink over time so in order to counter act this you need to forcibly push the trim into each corner so as to actually stuff the trim into the corners then add a little drop of instant adhesive to the end of the trim as you set the butt seam. Use a little nail polish remover if you get a little glue mess.
6. After the grille has been successfully installed simply snap the factory emblems back in place.
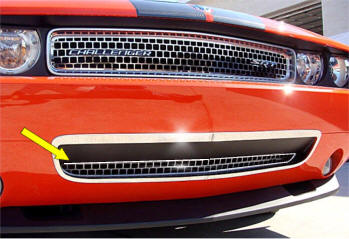
7. The lower grille section will install in exactly the same way as the top section only there are no emblems to replace. The lower grille section has been designed as a brushed part so as to allow the grille to be seen. Since the factory grille faces slightly downward a polished grille will simply disappear in its reflection so a brushed grille has been created to compensate for this problem.
 or
or

For Help - please call 352 688 8160
M-F or email
us at admin@NewChallengerStore.com
NewChallengerStore.com a HotCarAccessories.com website
Not affiliated with
Dodge, Chrysler Corporation
or it's divisions.