NewChallengerStore.com
CHALLENGER LOWER FRONT BUMPER TRIM RING
Part #
ACC-152017 & ACC-152018
Instructions
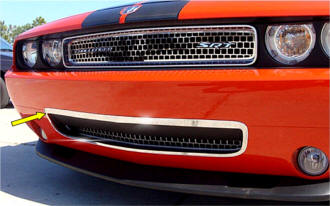
This new trim ring has been designed to offer a really nice finish to the front bumper grille opening. It’s the part you didn’t realize was missing until you have installed it and has been made especially to enhance our factory lower grill overlay.
Your new accessory comes to you with a clear protective liner. This liner will help to keep your new parts clean during installation. You will be instructed when to remove the liner during the detailed installation.
1. Thoroughly scrub clean the bumper insert area with household Isopropyl Alcohol (or rubbing alcohol) found stores hardware department to remove any and all waxes and oil.
2. Once properly cleaned take the piece of test strip tape (included) and remove a portion of the back red liner or a piece of masking tape . Stick the test tape strip to the area in where you will be mounting your new trim. Test several areas. If it is tacky and sticks then proceed to the next step. If it is not sticking very well in any of the spots you tested then re-clean the area until the test strip sticks to all areas. If the test strip tape doesn't stick well neither will your new trim piece.
3. Take the promoter (included) and swipe the entire area where your trim will stick to. This will insure a nice strong bond long term. The promoter is clear and will not damage or stain your paint.
4. Without removing the
rear red liner - set the trim ring in place to
get acquainted with the position as well as just
how you will set the ring in place. The attachment tape is very
aggressive and will not allow you to reposition the ring once you
have set it in position so take your time positioning the ring.
If the trim piece does not fit properly - STOP. Call us.
TECH TIP: Using your thumbs to the inside of the ring will help
you to achieve an aim for positioning. Try doing this a couple of
times before permanent attachment. Once you are ready simply peel
the red release liner from the back of the ring and then carefully
and slowly position the ring pressing firmly along the entire shape
to set.
IMPORTANT NOTE: The top thicker portion of the trim ring will
NOT attach to the paint along the bottom of this section and need
only be pressed along the top edge.
Once you have successfully
installed the trim ring peel the clear top protective liner off.
5. You have been supplied with a
length 1/8” chrome trim. This trim has been supplied to finish the
edge of your new trim ring. To install it apply a thin bead of
adhesive promoter (provided) along the outer edge of the trim ring
directly to the paint (this will not harm your paint). Peel a small length of
the red release liner from the back of the chrome trim and start at
the very bottom center on the trim ring, set the trim and press it
along the edge of the ring directly to the paint as you pull the
liner until you reach the start point. Snip away the excess trim and
set the end into a nice tight butt seam.
TECH TIP: This trim will
have a tendency to shrink over time, to compensate for this place a
small drop on instant adhesive (not included) to the end of the trim before you set
the butt seam. Doing this will prevent a gap from forming over time.
For Help - please call 352 688 8160 or email
us at admin@NewChallengerStore.com
NewChallengerStore.com a HotCarAccessories.com website
Not affiliated with
Dodge, Chrysler Corporation
or it's divisions.